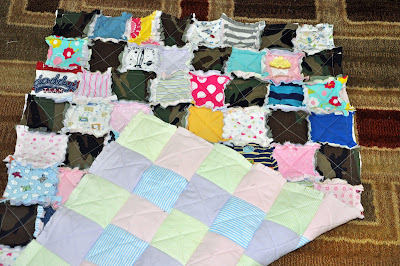
Thought I would share with you all how I made the rag quilt, incase anyone wanted to try it out for themself!
First you'll need to do some math. Figure out what size you want your squares to be and how big you want your blanket to be. I decided to have 4 inch squares and to have 8 squares by 12. So, I needed to cut out 96 five inch squares. I cut them 5 inches, because you'll need a seam allowance.
I decided I wanted to make my quilt out of my children's baby clothes as well as my husbands old uniform. They Air Force is moving to a new uniform, so he will no longer need these.
Now it is time to figure out your pattern. I just went with the order of birth in the family. So, my husband's was first, then my son's and daughter's. I also wanted to make sure that my back fabric was in the correct order and that I didn't have two of the same clothing fabrics next to each other.
This seemed good to me. I pinned the three layers together.
Flannel back, batting in the center and clothing on top.
(Sorry, it's hard to see the batting in this picture, but it's there.)
Now you will need to sew an X on each individual square.
I did this by row, instead of doing all 96 at once. So, I did 8 at a time and then I connected them.
You need to sew it to where the front of the quilt has both edges sticking upwards.
It should look like this.
Next, I cut the edges (make sure you don't hit the stitches!) that connected the row. You could do this at the end, but it was easier for me to cut them this way, then once I had a few rows together.
Now you will need to pin the rows on top of each other and sew all the way across the 8 squares. Then cut the edges, again.
Should look like this afterwards. (This is me cutting the edges)
After you have all of your rows together, sew around the outside of the entire quilt.
Then cut the edges, again.
This quilt was fun to make, but it was also a little stressful.
I kept messing up in the beginning. I would sew my seams facing backwards or my sewing machine would mess up.
You know, cause it wasn't the user's fault. Haha.
But, once I got the hang of it, the quilt just came together! At one point I was sewing the longer rows together and had a pin go up under my skin and rip my finger. I should move those pins faster while sewing!! My son gave me one of his lovely Spider-Man Band-Aids, so all was good.
A little later, my son was watching me sew... while drinking chocolate milk.
Can you see where this is going?
Yup... he spilled the milk and he soaked three squares. One was white! He felt awful and I tried to comfort him. Inside, I was slightly freaking out. I hand washed the squares, tossed them in the dryer and hoped all would be well.
It was! YAY!
I've never done such a HUGE sewing project before. I'm glad I finally got around to it, but I have to tell you... I'm so glad I'm done with that.
Oh wait, I have to make another one... for my Mother-in-law. I think It'll be smaller.. and maybe not a rag quilt. Something a little easier. And perhaps with a single piece of fabric for the back.
Yup, that seems better.
Please, do try this, and let me know how it goes! I want to see it!


5 comments:
That is so so cute!! And you look and make it sound so easy to do. Great job!
Thanks so much for sharing how to make this darling quilt. I have seen them but didn't know how to get the raggy edges. You have a family treasure now with all kinds of memories sewed up in your quilt. It doesn't look like it would have to be AS exact as the traditional style quilting so I may give it a try. I saw your post over at "Thrifty Thursday".
GREAT and SWEET project. A good keepsake for the whole family as well. Your son is adorable.
Thanks for sharing.
Terrie from Hong Kong
What a great idea! Easy to follow tutorial. I appreciate that! My children are all adults now. Would love to make each one of them one.
Thank you for sharing.
www.projectqueen.org
Interesting thoughts.
Post a Comment