Friday, September 30, 2011

My Favorite Pumpkin... EVER!

My beautiful little girl was so cooperative! I had to share these!


 I love that they're making the same face here, haha. 
Love them!


Trying out the tutu I made her! She loves it!

 It's pretty tasty!


 I really love how much they love and adore each other! I'm so lucky!


Sunday, September 25, 2011

Halloween Tutu

A couple of weeks ago, when my MIL was in town, she bought Emmelyn this cute Halloween themed shirt. I loved it so much I decided to make a matching tutu for her to wear for Halloween!


This is my first tutu and I just love it! I made it on ribbon so I can tie it behind her and have a cute little bow! Also, I can add to it when she is bigger. I'm going to have her wear black leggings underneath and I plan to make her a matching bow, too! Very excited to see her in this. She's asleep at the moment. Hmm... I guess I'll wait until Halloween!

Saturday, September 24, 2011

Two Ingredient Pumpkin Cookies!

Today I tried out this two ingredient pumpkin cookie recipe I saw floating around the internet. I was a little skeptical, but I have to tell you, they are amazing!

Mine actually consisted of three ingredients since I added raisins... four if you count the frosting. 

Okay, so you'll need:
 
One box of Spice Cake
One 15 oz can of Plain Pumpkin
I added raisins 
and used cream cheese frosting for some of them.

Just mix the ingredients together and plop spoonfuls on to a baking sheet.  They will bake and be the same size and shape as what you plop on to the sheet. Bake them at 350 until done.
 
This picture really doesn't do it justice, but you should try them anyway!

Thursday, September 22, 2011

Tortilla Roll-ups

Here's a delicious meal that my family just loves!

What's great about them is that you can make them any way to suit your family's tastes. 
It's fast, and I'd say fairly healthy, depending on your fillings. 

Here's what we used tonight. In the past we have used avocado in place of the cucumber and I bet bacon would be pretty tasty, as well. 

Have you tried this cooking cream stuff? I love it and use it on so many things, besides pasta!

Okay, spread your cream on the tortilla and add your meat and cheese.

Then add your veggies... I used spinach, tomato, and cucumber this time.


 Make sure you use really thin sliced toppings for easier rolling. Like I tell my husband, this is NOT a burrito!

 Cut in half then cut until you have 8 pieces.


Yum, so refreshing and tasty! 
Hope you try this out and make your own variations!


Saturday, September 3, 2011

Rag Quilt Tutorial

Thought I would share with you all how I made the rag quilt, incase anyone wanted to try it out for themself!

First you'll need to do some math. Figure out what size you want your squares to be and how big you want your blanket to be. I decided to have 4 inch squares and to have 8 squares by 12. So, I needed to cut out 96 five inch squares. I cut them 5 inches, because you'll need a seam allowance.

I decided I wanted to make my quilt out of my children's baby clothes as well as my husbands old uniform. They Air Force is moving to a new uniform, so he will no longer need these.


Now it is time to figure out your pattern. I just went with the order of birth in the family. So, my husband's was first, then my son's and daughter's. I also wanted to make sure that my back fabric was in the correct order and that I didn't have two of the same clothing fabrics next to each other.


This seemed good to me. I pinned the three layers together.
Flannel back, batting in the center and clothing on top.
(Sorry, it's hard to see the batting in this picture, but it's there.)


Now you will need to sew an X on each individual square.


I did this by row, instead of doing all 96 at once. So, I did 8 at a time and then I connected them.


You need to sew it to where the front of the quilt has both edges sticking upwards.
 It should look like this.
  

Next, I cut the edges (make sure you don't hit the stitches!) that connected the row. You could do this at the end, but it was easier for me to cut them this way, then once I had a few rows together.


Now you will need to pin the rows on top of each other and sew all the way across the 8 squares. Then cut the edges, again.


Should look like this afterwards. (This is me cutting the edges)


After you have all of your rows together, sew around the outside of the entire quilt.
Then cut the edges, again.


This quilt was fun to make, but it was also a little stressful.
I kept messing up in the beginning. I would sew my seams facing backwards or my sewing machine would mess up.
 You know, cause it wasn't the user's fault. Haha.

But, once I got the hang of it, the quilt just came together! At one point I was sewing the longer rows together and had a pin go up under my skin and rip my finger. I should move those pins faster while sewing!! My son gave me one of his lovely Spider-Man Band-Aids, so all was good.

A little later, my son was watching me sew... while drinking chocolate milk.
Can you see where this is going?

Yup... he spilled the milk and he soaked three squares. One was white! He felt awful and I tried to comfort him. Inside, I was slightly freaking out. I hand washed the squares, tossed them in the dryer and hoped all would be well.

It was! YAY!

I've never done such a HUGE sewing project before. I'm glad I finally got around to it, but I have to tell you... I'm so glad I'm done with that.
Oh wait, I have to make another one... for my Mother-in-law. I think It'll be smaller.. and maybe not a rag quilt. Something a little easier. And perhaps with a single piece of fabric for the back.
Yup, that seems better.


Please, do try this, and let me know how it goes! I want to see it!

Friday, September 2, 2011

Rag Quilt

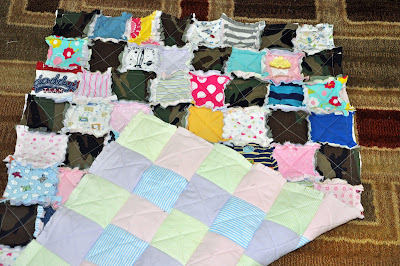
Well, I finally did it. I finished the quilt that I started over three years ago. Yup.... what a slacker.


I think deep down I was waiting for baby #2 to come around. Yup, that's it.
Well, anyway.
 It's done now, and I LOVE IT!

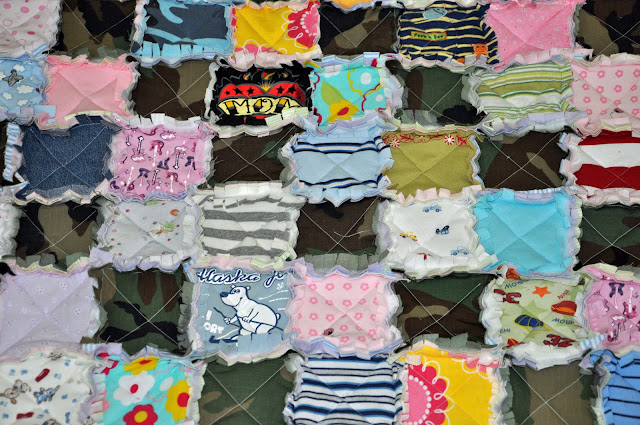
 These pictures really don't do it justice.


It took me about 4 days of hard work (and a few casualties) to finish the job. I'd say all-in-all about 20-24 hours.

What do you think?
It's not perfect. Afterall, this is my first HUGE sewing project. Usually my projects get done in a few hours, at most. It doesn't have to be perfect. It's mine and it represents my life and the three people I love most! It's definitely something I will always cherish.


Some of these outfits were really hard for me to cut up. For example, the yellow and pink flower one and the teal with flowers. I kept picture my daughter wearing them and how fast she is growing. I do have to admit, this is way better than some outfit sitting in a box for years and years.


The "Mom" shirt Landon wore for my first Mother's Day! (2007) I can't find a picture of it on my computer though. =(


The back side is made out of flannel squares. I already had a yard of each color on hand. The quilt ended up costing about $2. I had everything on hand, but did run out of thread at one point.

Stay tuned for a tutorial blog!

Related Posts Plugin for WordPress, Blogger...